Overview: The WordPress block editor is a useful feature, allowing you to compose and format content for rich and flexible layouts on your WordPress websites. Various block types are available in WordPress, and once you learn how to use them effectively, you’ll greatly improve the impact of your site! These are our pointers on how to use the WordPress block editor!
WordPress blocks offer a potent, flexible way to customize your website’s content and appearance. These blocks allow users to add and edit written and image content elements — like paragraphs, images, and widgets. There are over 90 default blocks available in the current version of WordPress — covering texts, media, widgets, and theme elements!
In addition to this, the current Gutenberg block editor introduces drag-and-drop functionality with a better visual preview of the content than the traditional or classic editor. Compared to older versions of WordPress, this new block-based editing approach provides a more user-friendly experience and a larger variety of customization options. And if you wish to expand the functionality of the block-based editor even further, a WordPress block plugin will work wonders!
This blog will explain everything you should know about blocks and how to use the WordPress block editor. We’ll also share some info on plugins to expand your block collection and provide more customization possibilities!
What is the WordPress Block Editor?
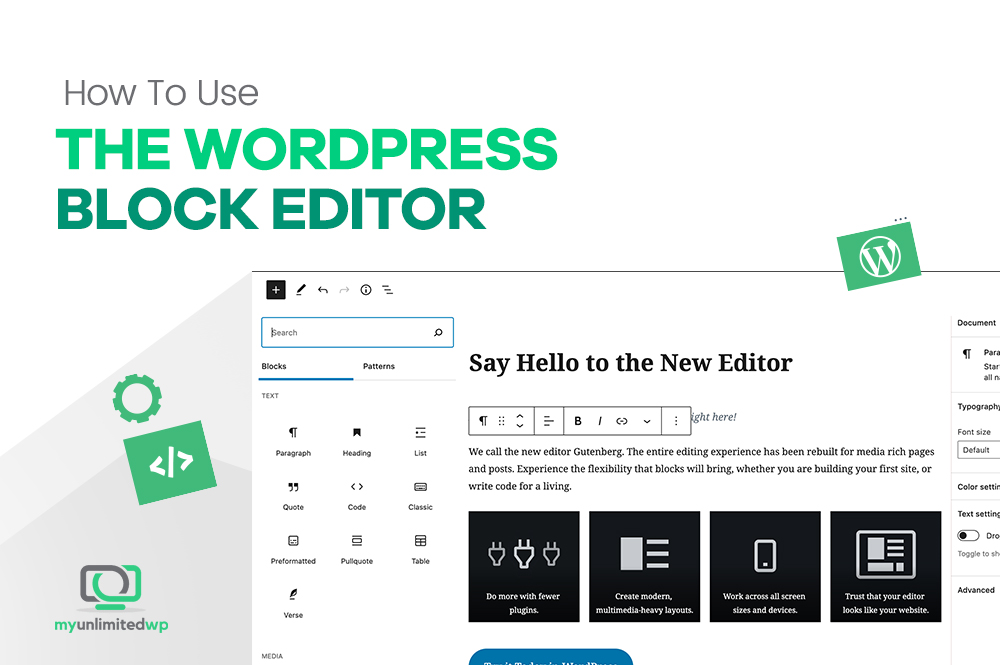
The current block-based WordPress editor, also known as Gutenberg, replaced the classic editor. We’ve been in the business of WordPress for over two decades, and we had a certain fondness for the classic version, but WordPress 5.9 (the current update as of now) offers a new, more modern approach to creating content in website — and we’re happy to see such a step forward in intuitive web content creation.
Whereas the old editor often involved more expertise and effort to create mixed-media websites and pages, the block editor makes it more straightforward. As its name suggests, the block editor lets you add content to a post or page using blocks — in other words, individual content elements such as text, images, videos, and more.
>> Related Reading: WordPress 5.9: Everything you need to know
How to Use the WordPress Block Editor?
Using the WordPress block editor is not rocket science. After just a few minutes, you’ll be block editing to your heart’s content! To get started, log in to your WordPress dashboard and create a new post or page, or navigate to the editor for the post or page you want to edit. Once you’re in the editor, you’ll see a blank canvas where you can start adding blocks.
>> Related Reading: WordPress Pages vs. Posts: What’s the difference?
Adding Blocks:
To add a block in the body of a post or page, click on the plus sign (+) button within the editor. This will open a panel that displays all the available blocks you can add to your content. You can search for a specific block or browse through the list to find the block you want to use.
Do you want to include a bulleted list? Just click “List!” Do you want to add a calendar linking to past content from certain dates? Just search the block selector for “Calendar” and click! It’s that easy!
Once you’ve found the block you want to use, click on it to add it to your content. You can add as many blocks as you want, and you can easily rearrange them by dragging and dropping them into place.
Customizing Blocks:
Each block comes with its own set of customization options that you can use to make your content look just the way you want it to. To access the block settings, click on the block you want to edit. This will open a panel that displays any available options for that block.
Depending on the block, you may be able to change the font size, color, and style, adjust the alignment, add a link, and more. Experiment with different settings to see what works best for your content.
Formatting Text:
One of the most common blocks you’ll use in the WordPress block editor is the text block. With the text block, you can add and format text just like you would in a word processor.
To add a text block, click on the plus sign (+) button and select the paragraph block — or just start typing!
To format the text you’ve typed, just highlight the text you want to change. A formatting toolbar will pop up in the block editor. Using this toolbar and the sidebar in the editor, you can change the font size and style, add links, change text to bold or italics, and more.
Inserting Media:
The WordPress block editor also makes it easy to add media to your content, such as images, videos, and audio. To add an image block, for example, click on the plus sign (+) button and select the image block from the list of available blocks.
Once you’ve added the image block, you can upload an image from your computer or choose a previously-uploaded image from your media library. You can also customize the image by adding a caption, changing the size and alignment, and more.
One of the nice things about the WordPress block editor is that you can easily move blocks around within the body of a post or page. If you inserted an image at the top of your post, but later change your mind and decide it would look better in the middle, just click on that block then click the “Move down” button.
>> Related Reading: WordPress Photos – A directory of free-to-use images for WordPress
Publishing Your Content:
Once you’ve finished creating your content and adding all your desired blocks, it’s time to publish it. Publishing is a piece of cake and just a click away. Simply click on the “Publish” button on the top right-hand corner of the screen. This will render your content live on your website for everyone to see.
If you’re not ready to publish your content yet, you can also save it as a draft or schedule it to be published later and time.
>> Related Reading: How to schedule your posts in WordPress
Using Reusable Blocks:
If you find yourself using the same block over and over again in your content, you can save it as a reusable block. This makes it easy to add the block to your content without having to recreate it every time.
To create a reusable block, select the block you want to save and click on the “Create a Reusable Block” button. Give your block a name and click on “Save”. You can then access your reusable block by clicking on the plus sign (+) button and selecting it from the list of available blocks.
Installing and Using Plugins:
The WordPress block editor is also extensible, meaning you can add new features and functionality to it by installing plugins. There are thousands of plugins available for WordPress, so you can easily find a plugin that meets your needs.
To install a plugin, go to your WordPress dashboard and click on “Plugins” in the left-hand menu. Click on “Add New” and search for the plugin you want to install. Once you’ve found the plugin, click on “Install Now” and then “Activate” to activate the plugin.
Once you’ve installed a plugin, you can use it by adding a block that corresponds to the plugin’s functionality. For example, if you’ve installed a plugin that lets you add a contact form to your site, you can add the contact form block to your content
>> You might be interested in: A step-by-step guide on how to install a plugin
In Summary:
The WordPress block editor is a powerful tool for creating engaging, beautiful content for your website. With its intuitive interface and flexible customization options, it’s never been easier to create content that captures your audience’s attention. Whether you’re a blogger, entrepreneur, or a large company, the WordPress block editor works equally for everyone and help you take your content to the next level. So start exploring the WordPress block editor today and see how it can transform the way you create content for your website.
Still not sure about how to best use the many features of WordPress? The talented team at MyUnlimitedWP has answers to all your questions! Reach out to us today for more details!